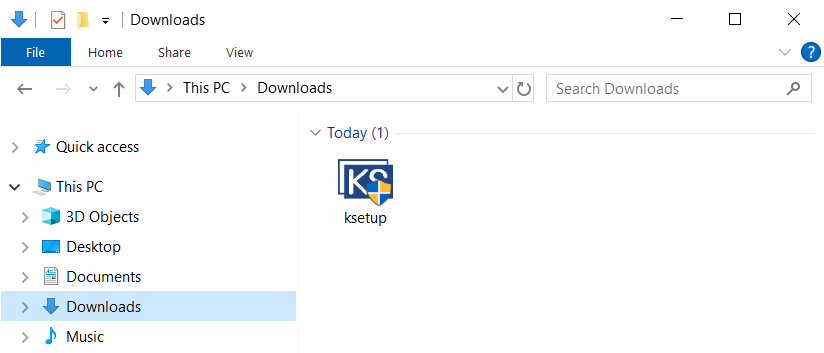
To install the software start the ksetup.exe downloaded from server (by default Downloads folder).
Microsoft SQL Server Installer which we use, requires disks to have compression turned off. In some versions of the system, this option is enabled by default. We recommend that you check this option before running the installer.
It is also important to check if there are any updates in the Windows system that require updating or restarting the computer. This must be done before starting the installation.
Default setup location
The software is being installed
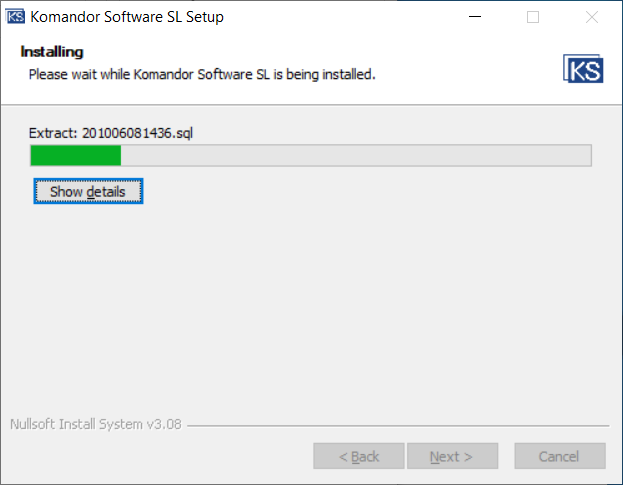
Installation takes about 20 minutes. Various packages and extensions are installed.
The software is being installed
Installation takes about 20 minutes. Various packages and extensions are installed.
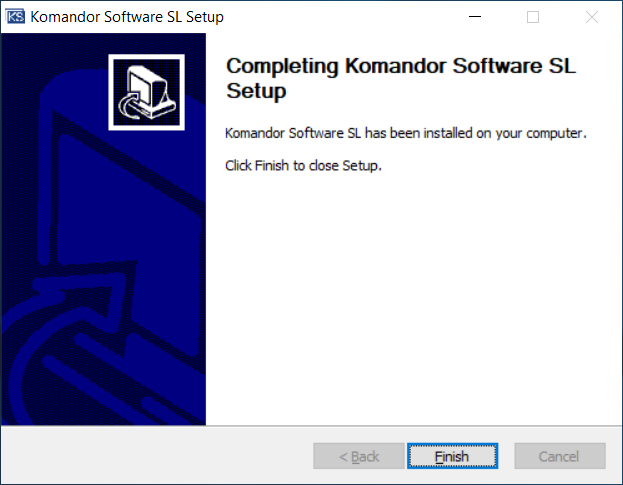
Installation completed
Finish the installation process
Komandor Software icon
Icon should be located on the Desktop. You can start the application.

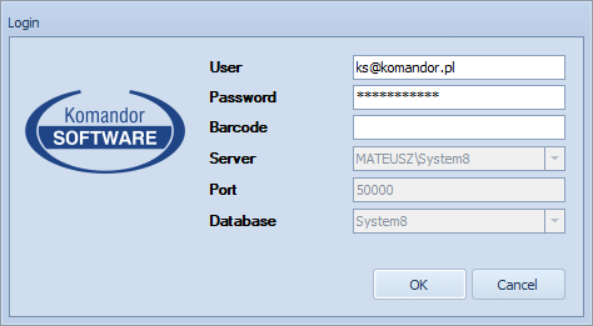
The main login window
The main login window contains login and password (filled by default) and database parameters
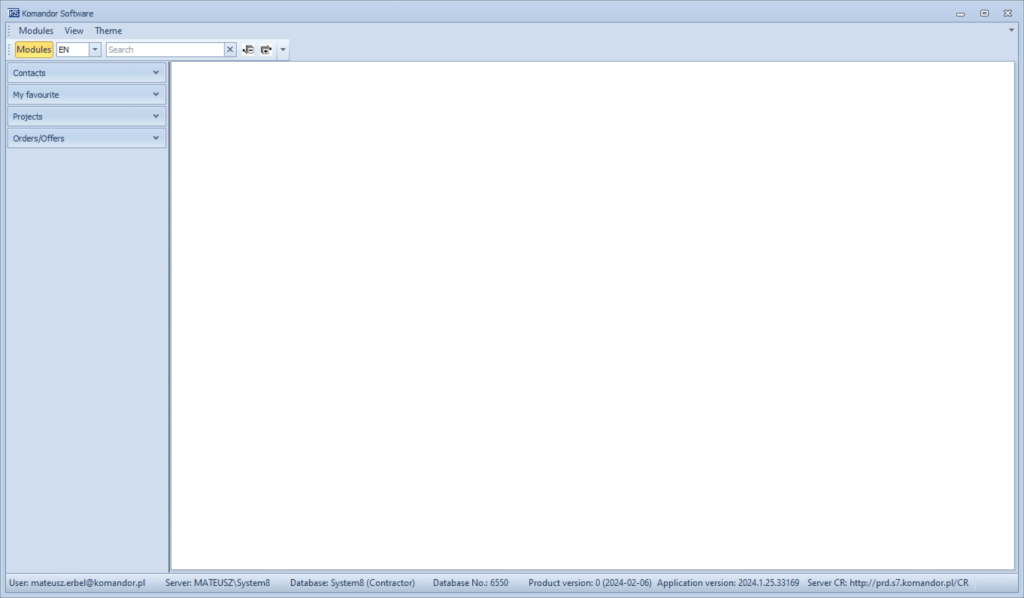
The main Komandor Software window
On the left side You can find modules availiable in the Komandor Software software.
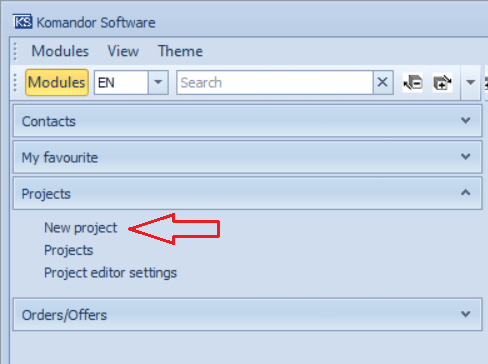
To start new project find the right module on the left side of the main window
Projects > New project
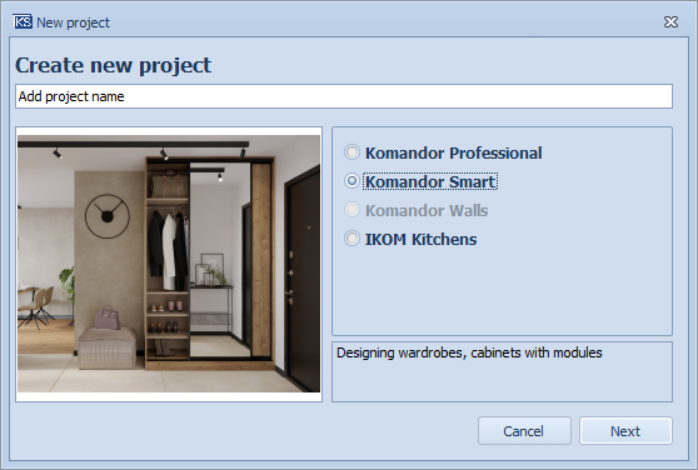
Project wizard
Select the library and click next.
Loading resources

Project settings
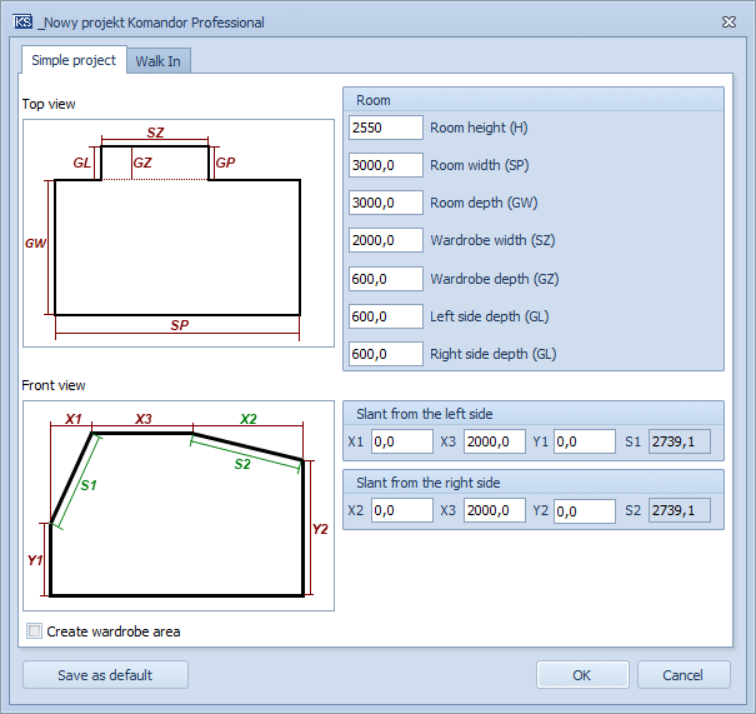
The main project window with parameters. You can add dimensions of the room, wardrobe, slants etc.
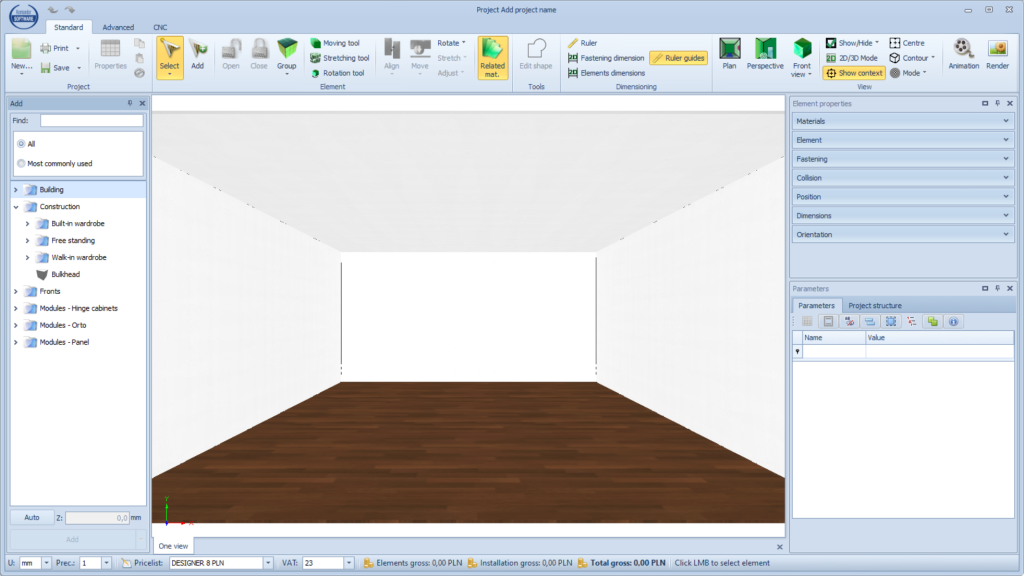
Project window
On the main project window You can find the project area in the center, library with the elements available to use on the right side. There are some icons on the top of the window.
Please check the process on YouTube
After preparing the project and creating the order, we can generate various printouts. They are available from the main menu of the order. Please check the screens below.
New project
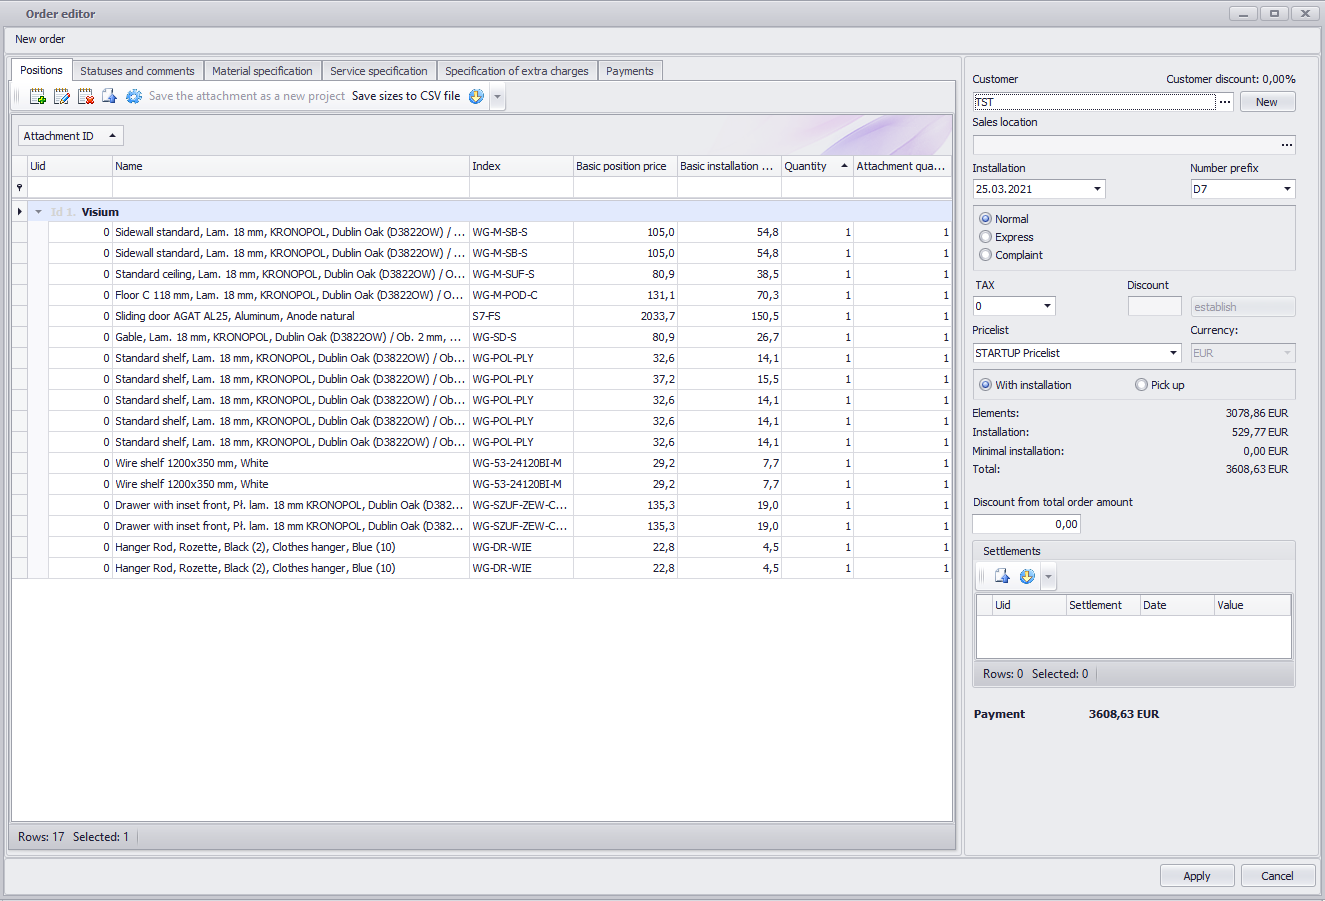
New order
New order create form allows you to generate order for the customer. Fill the customer name, installation date, etc.
Generate printouts
You can generate the printouts from the Manage orders module.
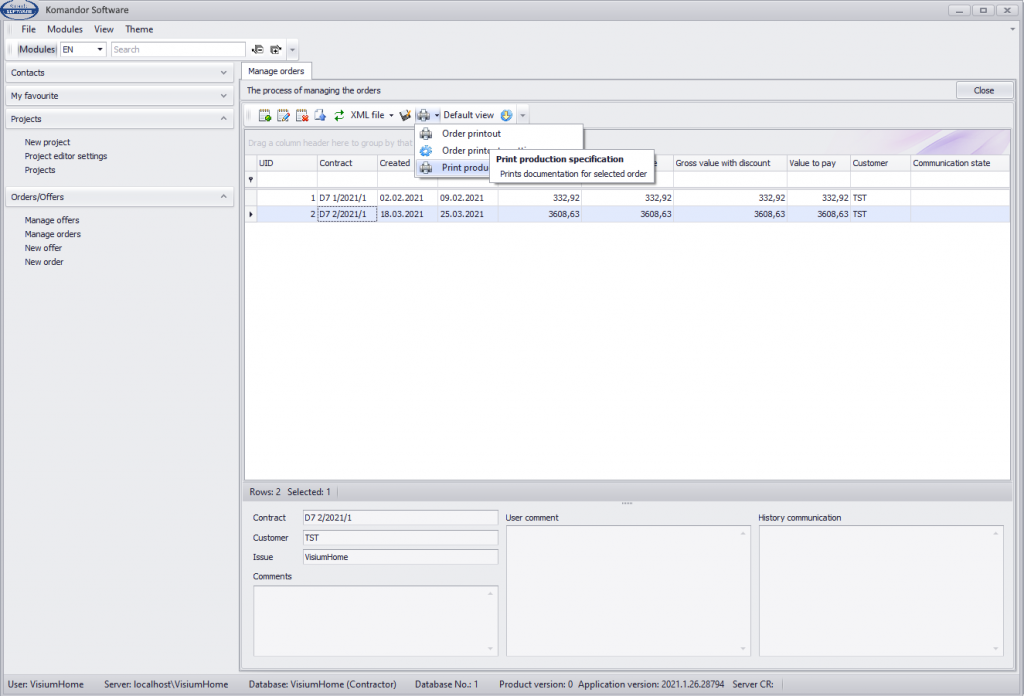
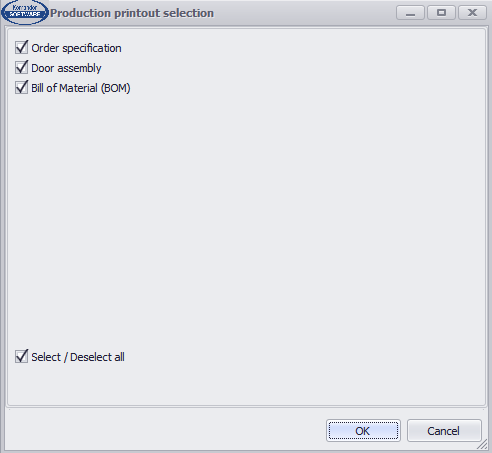
Printout selection
Please select documents type.
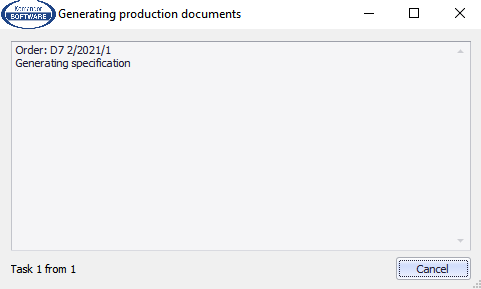
Generating process
It takes some time to generate documents. Wait until they pop up.
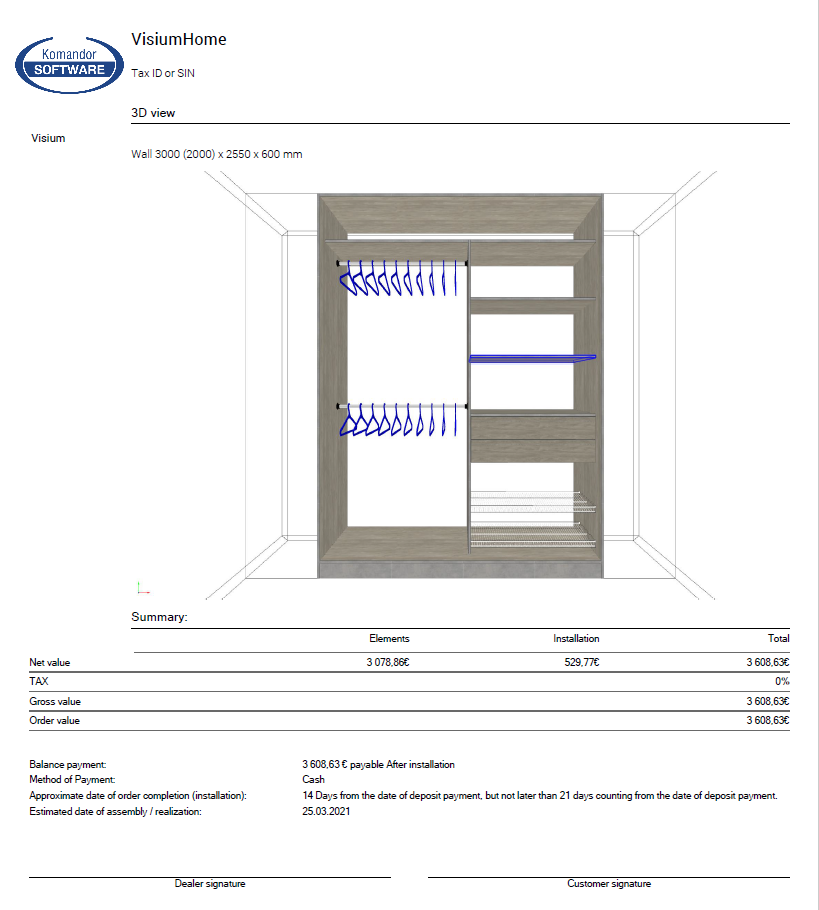
Order printout
Order printout is the main printout for the customer. It contains the list of elements, 3D view of the project and calculation.
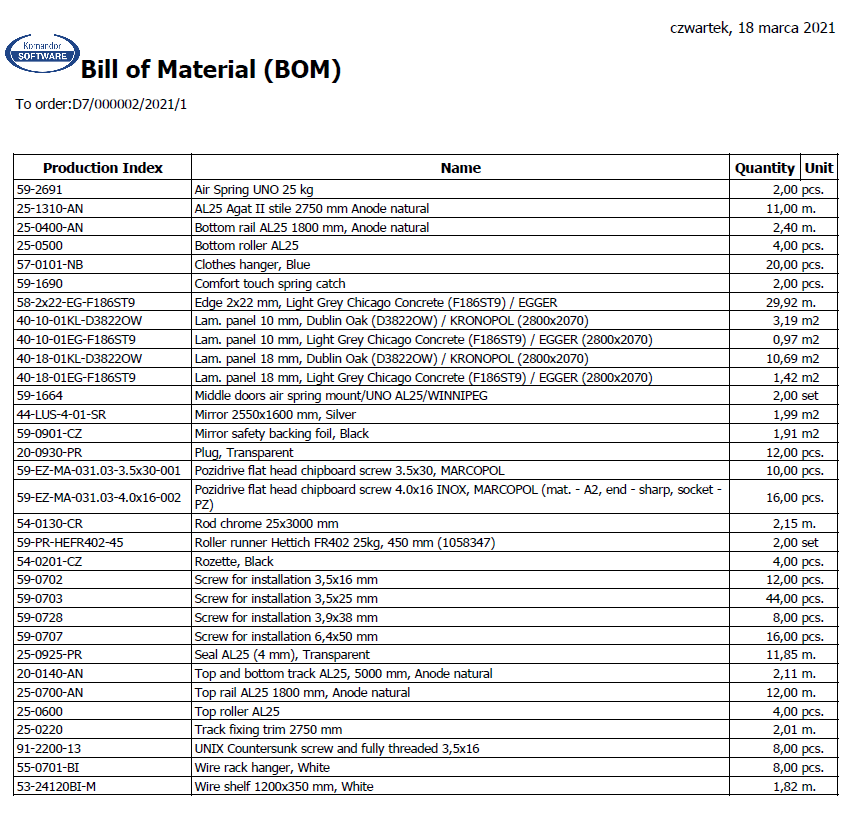
Bill of material
Bill of material (BOM) is the documents which contains the list of all raw materials from the order with quantities.
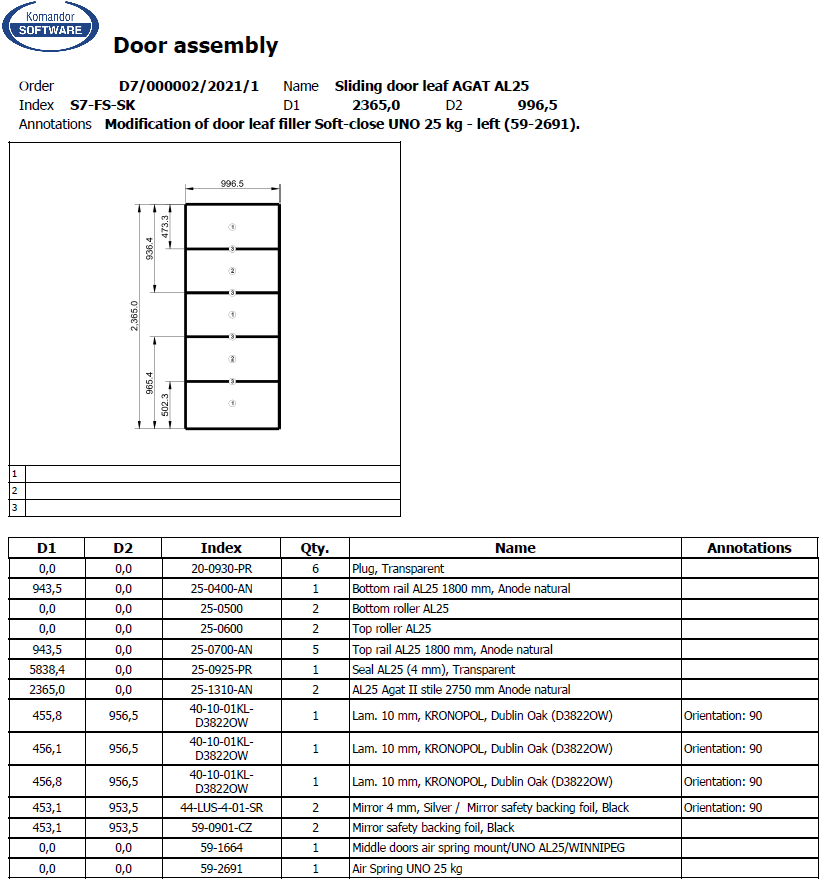
Door assembly printout
Door printout explain how doors should be assembled. It contains the view of the door and list of elements.
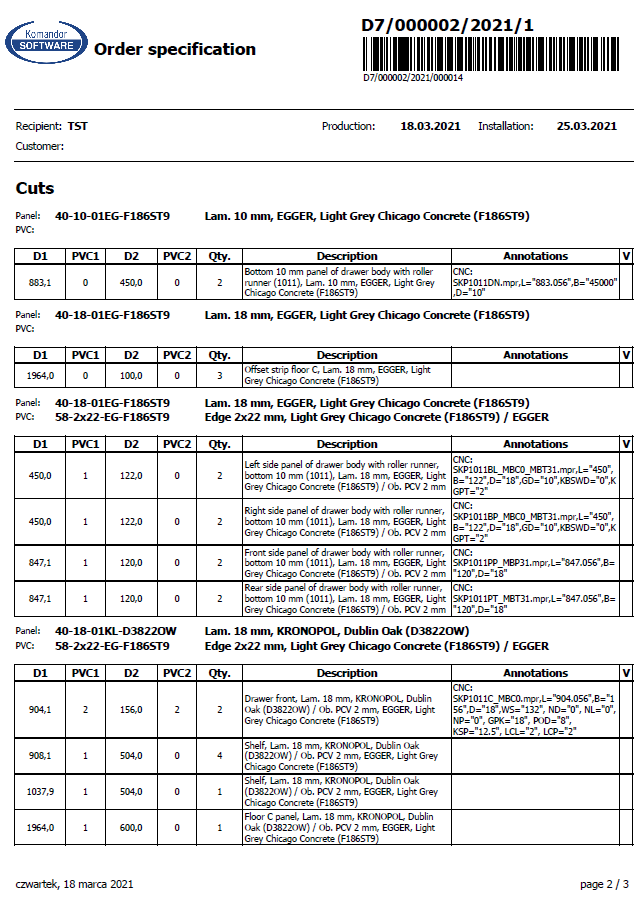
Order specification printout
Order specification is the list of elements from whole order.
Unfortunately not. The trial version has been prepared and configured to work by our team. This means that the application is ready to work and does not require any additional time to prepare the database. You can design, estimate and prepare production prints for the order.
The software allows you to calculate the price of the project in real time. Every time we add a new item, the software calculates the price of it. This means that the project always has the right price, which we can check.
The software calculates the price of:
- materials,
- production and assembly services,
- installation services,
- additional services (such as transport etc.).
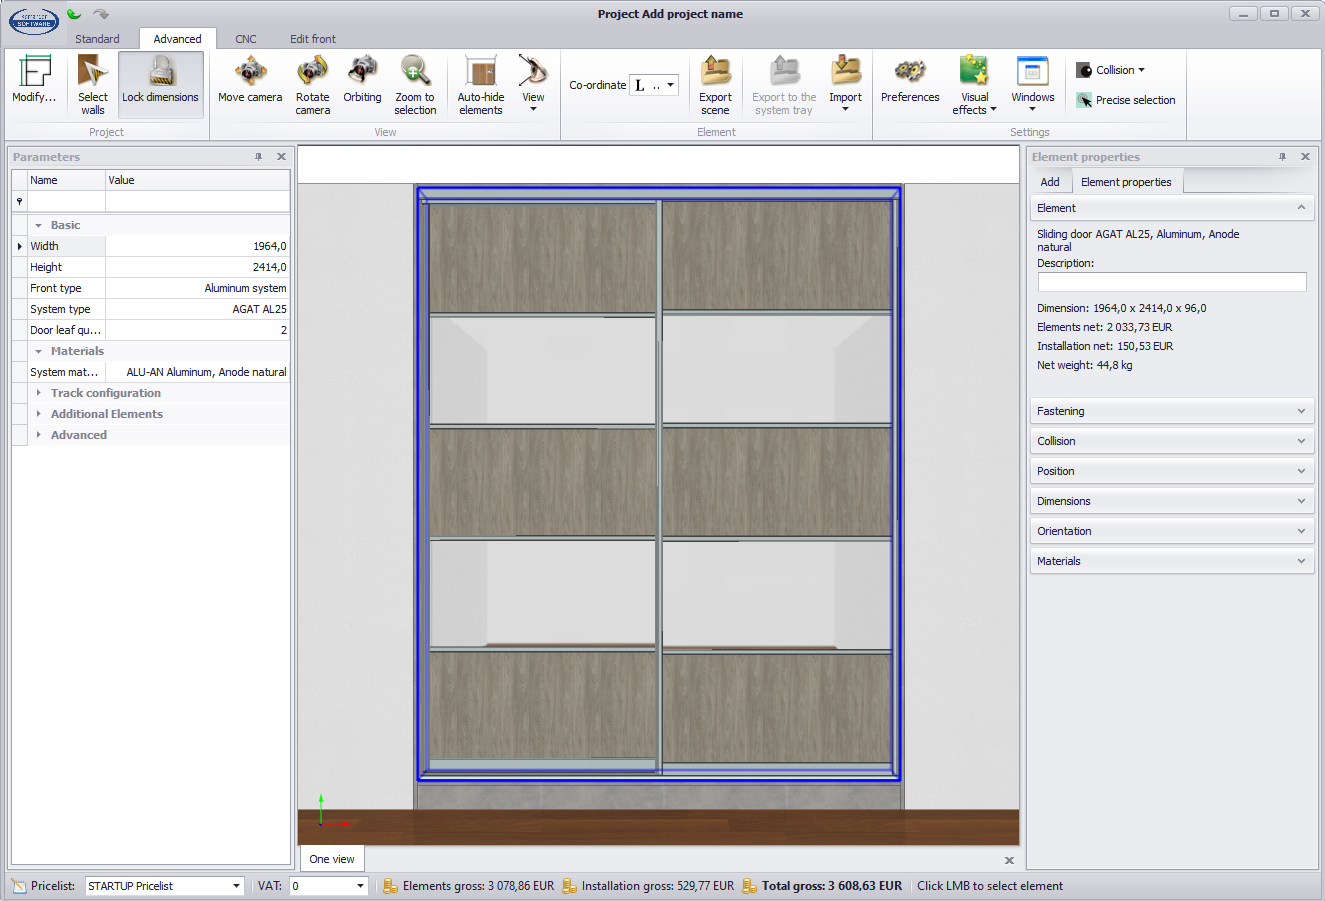
Element price
You can check the price of each element in the project. When you select the item, prices appears on the Element properties window. You can check the element price and installation price.

Total project price
At the bottom of the project window You can find the 3 values. They sum up the prices of all elements available in the project:
- Elements
- Installation
- Total
The software can be integrated with woodworking machines such as panel saws, edge banding machines, cnc machining centers, glass cutting machines and others. The software can communicate with external optimizers as well which helps to reduce the cost of manufacturing products. Integrations are only possible after additional analysis.
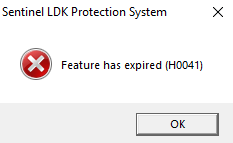
After the trial period when you start Komandor Software you can get the pop up window with the message that Feature has expired. This means that the 90 days free use ends up. To continue please go back to your account and purchase the license.
Feature has expired
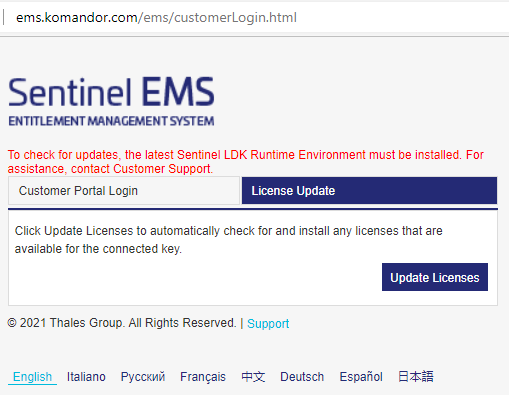
If you purchase the licence and still get that message please go to the EMS online service.
EMS on Firefox

Select the License Update and press the Update Licenses button. If The most up-to-date licenses are already installed message appears and the software doesn’t work please contact us.
We suggest to check the license on Firefox. On Chrome you will probably get the wrong info about latest drivers which should be installed to check for updates.
EMS on Edge/Chrome
| *Server Requirements: | **Workstation or laptop requirements: |
| Minimum Requirements: | Minimum Requirements: |
| · Processor: Intel Xeon E-2314 · Operating memory: 32 GB RAM · Hard drive: 2 * 1TB · Operating system: Windows Server 2019 · MSSQL Server 2019 Standard | · Processor: Core i5 or i7 · Operating memory: 8 GB RAM · Hard drive: SSD · Graphics card: Intel HD 4000 · Operating system: Windows 10 · Screen: Full HD (1920 x 1080) |
| Optimal Requirements: | Optimal Requirements: |
| · Processor: AMD EPYC 7282 16-Core · Operating memory: 64 GB RAM · Hard Drive: 2 * Samsung m.2 (nvme) 980 pro 2GB · Operating system: Windows Server 2022 · MSSQL Server 2022 Standard | · Processor: Core i7 or i9 · Operating memory: 16 GB RAM · Hard drive: SSD, M2 · Graphics card: NVidia, dedicated · Operating system: Windows 11 · Screen: Full HD (1920 x 1080) |
Project
| Shortcut | Name | Description |
|---|---|---|
| CTRL+S | Save project | Saves the current project |
| CTRL+SHIFT+S | Save project as new | Saves the current project as new |
| F2 | Change name | Renames an open project |
Element edition
| Shortcut | Name | Description |
|---|---|---|
| CTRL+C | Copy | Copies the selected item to the Windows clipboard. If more than one item is selected, the main item of the selection is copied (marked in blue) |
| CTRL+V | Paste | Starts inserting an item copied to the clipboard. The pasted element must be inserted (clicked) in the same way as when inserting an element from the tray. The difference is that the pasted item has the same parameters and material settings as the item copied to the clipboard |
| CTRL+Z | Undo | Undo last operation |
| CTRL+Y | Redo | Redo the last undone operation |
| DEL | Delete | Deletes selected items |
| ENTER | Properties | Opens the properties window for selected elements |
| ESC | End the action | Ends the currently running action, e.g. element insertion mode or animation. If no action is running, ESC will deselect all checked items |
| ALT+2 | Collapse materials | Collapses the material list for the Materials tab in the Element Properties panel |
Element insertion
| Shortcut | Name | Description |
|---|---|---|
| 2xLMB / LMB | Insert element | In selection mode (default), double-clicking on an item in the tray will load it from the database. To insert the loaded element, click in the scene. If the insertion mode is on, then each LMB click in the scene will insert the selected item in the tray (you do not need to double-click in the tray) |
| CTRL+LMB | Save project as new | Pressing the CTRL key while inserting an element into a scene causes the element to be inserted without fastening. |
| SHIFT+LMB | Change name | Pressing the SHIFT key while inserting an element into a scene causes that the plane to which the inserted element will be moved is highlighted. We change the plane with the mouse scroll. |
| CTRL+1 | Insert | Activates the normal mode for inserting elements from the tray. |
| CTRL+2 | Insert next | Activates the mode of inserting several items from the tray one by one. After inserting one, the next same element is loaded immediately. |
| CTRL+3 | Insert without fastening | Activates the mode of inserting elements from the tray without fastening. (When you insert an item, a warning appears in the Design Warnings window at the bottom) |
| CTRL+4 | Insert and open properties | Activates the mode of inserting elements from the tray where, after inserting an element into the scene, the properties window of the inserted element is immediately launched. |
Calculation of the distance from the wall
| Shortcut | Name | Description |
|---|---|---|
| CTRL+D | Calculate the position along the Z axis | In manual mode, calculates the position of the selected element along the Z axis to the nearest wall |
Selecting elements
| Shortcut | Name | Description |
|---|---|---|
| LMB | Selecting | LMB means Left mouse button. Selects an element in the scene if no action is running (insert, area selection, etc.). LMB can select elements only in the currently open group (or project) |
| CTRL+LMB | Add to selection | Pressing the CTRL key allows you to select more than one element in the scene |
| SHIFT+LMB | Select in a group | Selects an element in a group without opening it (e.g. a door leaf in a front). To select several elements in a group (e.g. several wings) just press CTRL |
| CTRL+A | Select all | Selects all visible elements in the scene. Elements hidden by a turned off layer (e.g. Interior / Exterior / Front), elements hidden by a rotated camera (e.g. elements on other walls of a wardrobe hidden when the camera is rotated) or elements outside the currently open group are not selected |
| CTRL+I | Invert Selection | Inverts the selection of elements |
Grouping of elements
| Shortcut | Name | Description |
|---|---|---|
| SPACE | Open group | Opens the currently selected group item. The function is available only when the selected element is a group of elements and allows it to be opened (e.g. sliding front, drawer module, column system module and all new elements-groups added to the project) |
| BACKSPACE | Close group | Closes the currently open group |
| CTRL+SHIFT+G | Group items | Groups selected elements placing them in a group with a given name. The new group has the same fastening as elements inside |
| CTRL+SHIFT+U | Ungroup items | Breaks the selected group down into its components (if the group was created by the user) |
Manipulating elements
| Shortcut | Name | Description |
|---|---|---|
| CTRL+P | Move | Enables / disables the element move manipulator. The manipulator consists of 3 XYZ axes and 3 planes after clicking on which the element can be moved in the desired direction or along the selected plane. The individual axes / planes are available only when moving the element in the given direction is possible (the XYZ position of the element cannot be locked) |
| CTRL+R | Stretch | Enables / disables element stretch manipulator. The manipulator consists of “cubes” visible in the corners of the element, where you can click and stretch the element in a given direction. The cubes are visible depending on the angle of viewing the element and when stretching the element in a given direction is possible (dimensions are not blocked) |
| CTRL+O | Rotate | Enables / disables the element rotation manipulator. The manipulator consists of 3 circles on which you can click and rotate the element in the XYZ axis. The circles are visible depending on the angle of view of the element and when rotation of the element is allowed |
Ruler
| Skrót | Nazwa | Opis działania |
|---|---|---|
| CTRL+ENTER | Next dimension | After entering a dimension on the ruler, the CTRL + ENTER key goes to editing the next dimension on the ruler. The same can be obtained by clicking the Next button. |
| CTRL+SHIFT+ENTER | Previous dimension | After entering a dimension on the ruler, the CTRL + SHIFT + ENTER key goes to editing the previous dimension on the ruler. The same can be obtained by clicking the Previous button |
Change view
| Shortcut | Name | Description |
|---|---|---|
| Num-2 | Rear view | Sets the rear view for the selected element, project (if nothing is selected), or group (if there is an open group) |
| Num-4 | Left view | Left view of an item / project / group |
| Num-5 | Front view | Front view for the selected element, project (if nothing is selected) or group (if a group is open) |
| Num-6 | Right view | Right view of an item / project / group |
| Num-8 | Top view | Top view of an item / project / group |
| Num-9 | Perspective | Perspective view of an item / project / group |
| CTRL+NumDel | 2D/3D | Switches the mode 2D / 3D |
| F12 | Print screen | Saves the current view |
Operating the camera
| Shortcut | Name | Description |
|---|---|---|
| LMB | Move camera | Pressing RMB (right mouse button) and moving the mouse moves the camera left / right / up / down |
| SHIFT+LMB | Orbiting | Moving the mouse while holding down SHIFT + PPM causes the camera to rotate around the selected element or to rotate the camera in the room if no element is selected |
| CTRL+LMB | Rotate camera | Rotates the camera in the room |
Shape editor / Front editor
| Shortcut | Name | Description |
|---|---|---|
| Page Up | Next base | Changes the modification reference point to the next one. You can choose left / right, both sides simultaneously |
| Page Down | Previous base | Changes the modification reference point to the previous one. You can choose left / right, both sides simultaneously |